
Efficient Deck Building
If you’re not familiar with the Fast-Cheap-Good project triangle, you should be. That’s because it’s a great tool—applicable to virtually any line of business—for recognizing and dealing with unrealistic clients. You know who I’m talking about: the ones who seemingly demand museum-quality work on a tight schedule, all at a discounted rate. While they might not understand when you tell them it will cost more to build a high-quality deck in time for their daughter’s wedding or the big company picnic later that summer, they probably will understand when you patiently break it down for them and explain that they have to pick two out of three.
That’s where building efficiently comes in. By figuring out ways to reduce material and labor costs without compromising quality, you can remain competitive. For some builders, that means streamlining the framing process, perhaps by standardizing deck sizes or even prefabricating deck packages off site. For other builders, it might mean closely tracking labor costs to optimize results.
Last fall, PDB reached out to a number of deck builders to find out their various methods for working more efficiently. Here is what they told us.
Stage the Job
For Mike Guertin, a remodeler and builder in East Greenwich, R.I., working efficiently means starting each job with a planned lumber drop. He says he coordinates with his lumberyard to ensure that his materials aren’t randomly loaded and delivered—so that he has easy access to the lumber he needs in the sequence he needs it.
If the deck is small and all the materials are delivered at once, he starts with the joist stock on the bottom of the pile, then the ledger stock, and then stacks the post and beam stock on top. The decking goes in a separate pile, says Guertin.
Another planning tip from Guertin is to develop a good working relationship with inspectors. Once you’ve gained their trust, many inspectors will allow you to skip some on-site inspections—such as for footing holes, lateral load connectors, and framing details—if you email them good photos that verify the work has been completed. Guertin notes that he can usually get approval in a couple of hours with a set of emailed photos instead of waiting a day or several days for an inspector to come out to the jobsite.
Tools and Jigs
Guertin believes that having the right tools for the job is one of the keys to working efficiently. To a standard assortment of saws, compressors, air tools, and hand tools, he has added an arsenal of specialty tools over the years. For example, he points out that a metal-connector nailer significantly speeds up the framing process over nailing joist hangers by hand. For tight spots, he recommends adding a simple palm nailer to your toolbox.
If some deck demolition is involved, it makes sense to supplement your pry bars and digging irons with one (or more) of the various decking removal tools that are on the market. Pennsylvania builder Matt Breyer says that his company keeps several different types on hand, including a Demo-Dek (greentektools.com) and a Duckbill Deck Wrecker (duckbilldeckwrecker.com), since each tool works slightly differently and better fits different jobsite conditions. If your company installs a lot of PT or tropical-hardwood decking, you’ll need at least one of the various types of deck-board benders and straighteners.
Specialty jigs made on site with leftover material can also be used to increase speed and accuracy. One of Guertin’s go-to jigs is his joist-hanger installation tool, which enables him to quickly nail hangers onto a ledger and beam (using a metal-connector nailer) and then drop the joists in place.
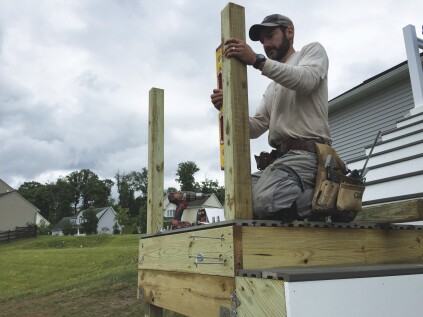
Another helpful aid is a simple post-holding jig, which is basically a hollow box made with scrap plywood or 1-by material that fits around a 4x4 post. Before installing a rail post, Guertin slides the jig over the post and clamps it in place so that it acts as a stop when he’s positioning the post. This allows Guertin to quickly register the post at the right height on the deck frame, rather than trying to eyeball it to a line while fastening it into place. Guertin uses a second clamp to hold the post tight to the framing while he’s bolting it into place.
Like many deck builders, Guertin runs his 4x4 railing posts a little high when he installs them, then cuts them to height later, using a laser to establish a level line. But a regular circular saw doesn’t have quite enough capacity to cut through a 4x4 post in one pass. In order to get a square cut, Guertin has a jig that is similar to his post-holding jig and can be clamped to the post to guide the cut. The cutting jig takes the place of drawing a cut line around all four sides of the post while ensuring a perfect square cut.
Footings
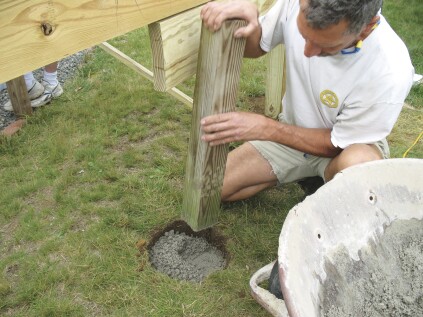
When a deck is above grade by more than a couple of feet, Guertin doesn’t pour the footings right away. First, he digs the holes and inserts the forms. Then he frames the deck, propping the beam up with temporary supports and suspending the finish support posts above the footing holes.
That approach allows Guertin to schedule the framing and footing inspections at the same time, instead of waiting a day or two for the inspector to come out and check the footing holes. When the inspection is complete, the concrete can be placed and the crew can go ahead and start the decking installation on top of the frame.

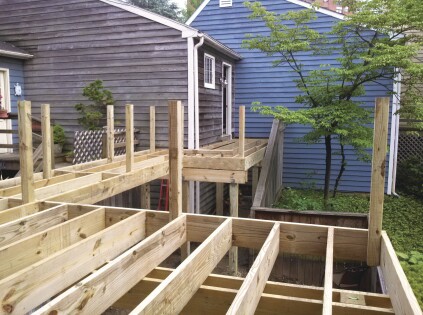
Greg DiBernardo, owner of Peachtree Decks & Porches, in Atlanta, is another deck builder who recommends framing from the top down. DiBernardo says it’s easier to accurately locate the footings, especially on irregular terrain, with the framing in place. It also allows his crew to dig the footings when the timing is most efficient for their schedule. For example, if two workers are laying decking, a third worker can start digging the holes.
Another advantage of top-down framing is that it allows a crew to work around the weather. And DiBernardo agrees with Guertin that it’s sometimes possible to get footing and framing inspections at the same time (which the inspectors like too, because it saves a trip for them). Occasionally, says DiBernardo, projects receive the final inspection along with the footing inspection if there is a good relationship with the inspector.

Framing
On composite decks that are between waist and eye level, it is really easy to see dips and waves in the deck boards caused by crowns or thickness variations in the framing. Instead of trying to correct the problem after the joists have been installed, DiBernardo’s crews first rip all of the joists to make sure they are uniformly sized with perfectly straight top edges before beginning the framing.
DiBernardo says that it takes only 10 minutes or so to snap chalk lines along the lengths of the joists and rip them to size. The reduction in strength is minimal, since only 3⁄16 inch or less is removed from the width of each joist, and the result is a very flat surface for the decking. On taller or lower decks, this step isn’t necessary, since the variations won’t be visible.

Michigan builder Bayn Wood considers the rim joist and joist blocking to be key components to a strong, long-lasting deck frame. Taking the time to reinforce these areas during the framing process avoids callbacks later on.
For example, Wood explains that the rim joist typically bears the load of all the railings, fascia, and borders (if used) but is often fastened to the main deck joists only with screws or nails driven into the end grain of the joists. To reinforce this connection, Wood installs one or two Simpson Strong-Tie DTT2Z lateral load brackets every 6 to 8 feet along the rim joist (a measure that Wood says is required by most municipalities in his area for proper rail-post attachment.)
Seam boards—where a deck board (or boards) is installed that runs at a right angle to the main field decking, usually to avoid butt joints and to get the best usage of decking lengths—typically require additional blocking for support. Most deck builders simply nail (or screw) joist blocking between two main deck joists, with no other connection to hold the ladder-like assembly together. But Wood has found that as the decking expands and contracts over time, the blocking gets pulled away from the joists because of the weak connection into the blocking end grain. So Wood reinforces the blocking with DTT2Z brackets or 1⁄2-inch-diameter threaded rod (or both) installed every 6 feet to hold the assembly together.


When you’re installing blocking, Wood cautions that it should always be installed vertically, rather than on the flat. While flat blocking offers more surface area for nailing, vertical blocking is stronger. And even when the flat blocking is protected by a peel-and-stick membrane, Wood has found that water still manages to penetrate the assembly and work its way into the attachment points. Before long, the connection loosens, allowing water and debris to accumulate, eventually leading to rot.
Railings and Stairs
If deck plans include a poured concrete landing for a set of stairs, Guertin tries to cast the landing at the same time as the footings. That means one less delivery for the batch truck, or—if the concrete is mixed on site—less time setting up and cleaning up the mixer.
When you’re installing the stair stringers, Matt Breyer points out that it can be tough to keep the bottom of the framing from twisting with all the abuse the lower rail posts get. To help strengthen this assembly, Breyer installs both vertical and horizontal blocking, which not only locks the posts in place and ties the stringers together, but also provides solid support for the decking.


Finally, when you’re installing guard posts, Guertin recommends optimizing guard-post spacing to match the lengths of the rail system being used. By precisely positioning the posts so that the rails fit exactly between them, you’ll save cutting time, and the spacing between the last baluster and post will match the spacing between the balusters.
This article was originally posted by DeckMagazine